DIY: HOW-TO BUILD A FIREPLACE (IN ONE WEEKEND)
One of my greatest energy (and weaknesses) is my sense of spontaneity.
I will go on road journeys on a whim, attempt new pastimes, implement new thoughts inside a day, and begin pretty large residence initiatives after considering them an afternoon or.
That’s simply me.
Now that you know that approximately me, it’s no marvel that a little over every week ago I decided I desired a fire in my home.
And dammit, I was going to build one.
The consequences greatly surprised me! It became a bit less complicated than I expected and through doing the work myself, I saved approximately 1000 dollars. Not bad!
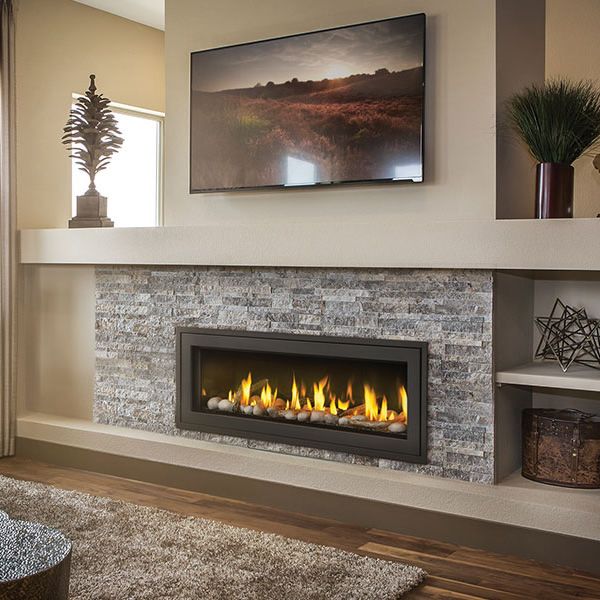
The pretty drastic difference, eh?
I am so very happy with the manner it all turned out and desired to percentage with you guys how we constructed this element in 1 weekend.
Watch the 4 step method within the video under.
FRAME
The fire sits on an outdoors wall of my domestic. I don’t think that subjects much, but I have received a few questions about that.
Wall 1
We constructed a frame, just like a small wall, and attached it to the studs at the wall. It becomes basically a huge container with studs every sixteen inches on center.
One we had wall one secured to the outdoors wall, we began constructing our 2nd wall.
Wall 2
The second wall offers the electric fireplace measurement. It stands proud about 8 inches from the outdoors wall. We used metal brackets to connect wall 1 and wall two collectively. Wall 2 became framed like you would a window. So if you haven’t constructed a window body before- you’re in a correct organization.
We watched a crap ton of YouTube motion pictures and learned how to frame a wall for a fire or window. Our glass piece from the hearth insert sits on a pinnacle of the stone. Our beginning for the fireplace changed into suited to the steel a part of the heart insert.
Then once we got that part performed, we delivered studs every 12 inches to be secure and included with drywall.
Drywall
We used a primer on the drywall to assist the stone to adhere to the wall. So brush that primer on first, allow it dry for a piece (consistent with producers hints) and then begin tiling your stone from the lowest up.
FIREPLACE INSERT
Important be aware: the electrical (plugin) fireplace I ordered is a 50 inch, insert. It’s amazingly important that in case you purchase a hearth insert you ensure that the heater is within the front of the insert and now not on the pinnacle, bottom, or side of the insert.
I did a crap ton of research on this to make sure I had the proper fireplace that wouldn’t leave mild my house on a hearth.
The precise hearth insert I purchased can be observed here: Touchstone Sideline Recessed Electric Fireplace with heater – Black
I’m now not positive why, but landscape inserts are more high priced than conventional rectangular inserts. Because, this is a semi-permanent venture, I opted for purchasing the only I in reality wanted.
STONE
It took me a little bit to find the stone I desired. Originally, the stone I nearly went with turned into $ninety a square foot. Instead, I found the quartz tile for $eight a rectangular foot ($3.98 a chunk). This little desire by myself stored me hundreds.
The precise stone I used may be discovered at Lowes or here: Desert Quartz Ledgestone
Important facet observes: Get a few heavy responsibility mortar. We used “Rapid Setting Tile Mortar.” Seriously, it’s surely important you get precise mortar, the stone is heavy. And constantly tile from the bottom up, not the front the top down.
MANTEL
The mantel, in reality, stands out against the lighter colored quartz. I’m a large fan of mixing stains that will help you get a good better look than simply the use of one shade. I ended up buying a small can of Ebony and a small can of Polyshades Bombay Mahogany Satin.
It will cost you about $12 for each, and also you’ll have plenty left over even from the smallest can.
Brush one coat of Ebony at the wooden and allow it take a seat for about 7 minutes and then wipe off with a dry rag. Then brush a good, thin coat of Bombay Mahogany and allow it take a seat in a single day. (Do not wipe the polyshade coloration off.)
Important facet notice: This mantel is not designed to have a TV sitting on it. The inside is hollow, but is wherein the power strip for the TV, Apple TV, and soundbar is saved. That way if I need to get right of entry to the cables, I don’t have to cast off the heart insert.
TV MOUNT
I’ve been getting a ton of questions regarding the TV mount. As you spot inside the video, I left a tiny rectangular hollow for my cords to undergo. Then we used a masonry drill bit and installed the TV via the stone.
This was the TV mount we used. Our mount doesn’t swivel or do something fancy, but I didn’t take care of the one's features.
If you’ve notion ever approximately having a fireplace in your home, however, don’t want to run a gas line, I highly recommend building an electrically powered hearth surround. It’s fee-powerful, beautiful, and surely makes a broad declaration in a room.
Hope you revel in this put up! And most importantly, I wish this conjures up you to tackle domestic projects of your very own.
Forever living debt free,
Have you joined the Manage Your Money Like A Boss community? Come on over and join the unfastened network of money nerds assisting every other and operating on being the quality we may be with our financial lives.